
This guide is here to help you simplify your Instant Pot.
You will learn:
- The cooking time equivalent for each cooking program button (e.g. soup, poultry.)
- How to toggle between low and high pressure settings.
- How to adjust the cooking temperatures of sauté and slow cook mode.
- How to set a delayed cooking timer for either slow cook or manual pressure cooking mode.
This guide will take you through all 18 buttons on the face if the Instant Pot, teach you how to set a delayed cooking time (great for slow cooker recipes), toggle between low and high pressure modes, and adjust cooking temperature settings for sauté and slow cook mode.
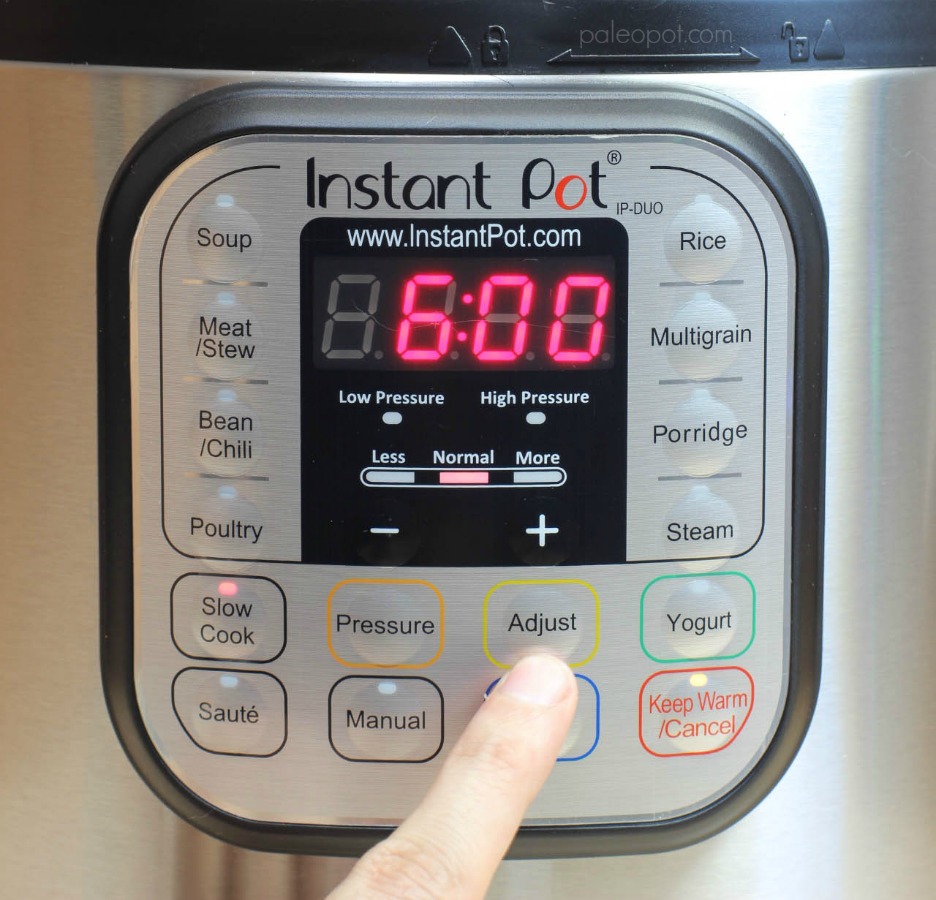
At first glance, the front panel of the Instant Pot looks like an infomercial. It has buttons for soup, meat/stew, bean/chili, poultry, rice, multigrain, porridge, steam, and yogurt on top of it being a pressure cooker that can also function as a slow cooker. Then you have the sauté feature that allows you to brown meats and get flavors started directly in the stainless steel insert, before you enter slow cook or pressure mode!
In my experience with the IP-DUO series, the rice and yogurt settings are the only fully automated cooking programs. The rest of the buttons simply provide you with a suggested amount of cooking time at high pressure. If you are not familiar with the different Instant Pot models, please do check out my model comparison guide:

Think of your Instant Pot as a new tool in your kitchen. Like every tool, it requires some practice to master. There will be a slight learning curve if you are new to the world of pressure cooking. You will find that cooking times will vary due to the size, thickness, and temperature of the food items you are cooking. For example, frozen chicken breasts can take as little as 15 minutes to cook, or can take up to a half hour if they are huge portions. When guesstimating cook times, shoot for a shorter cooking times, as you can always continue to cook something, whereas you cannot reverse cooking. You simply press the sauté button, adjusting the heat level if necessary, and finish cooking until the required temperature is met.
I will walk you through each button one-by-one, and show you the bare minimum that you will need to successfully operate your Instant Pot and cook some of my recipes!
Soup
The soup program is 30 minutes on high pressure. Depending on wether your are using fresh or frozen meats, soup times can range from 20 minutes to an hour.
Meat / Stew
The meat / stew program is 20 minutes on high pressure. Again, times can vary wildly depending on temperature, size, and thickness of the meats.
Bean / Chili
The bean / chili program is 30 minutes on high pressure. Another suggested cooking time at high pressure.
Poultry
The poultry button is only 12 minutes on high pressure, intended for uncooked chicken in small portions. Larger chicken pieces will require up to 25 minutes to reach a center temperature of 165°F. I use an instant-read digital kitchen thermometer for every piece of meat I cook. Using a thermometer will help you nail your cooking time. Frozen chicken usually takes 25 to 35 minutes depending on size and thickness. Cooking chicken can be a bit of a trail-and-error process at first. Remember that you can always finish cooking an undercooking piece of chicken by using sauté mode. Press the ‘adjust’ button to crank the sauté mode up to high if you want.
Slow Cook
The slow cook function can be programmed for anywhere between 30 minutes to 20 hours. Cooking time can be delayed up to 24 hours. The cooking mode can be set to normal (which is equivalent to low on most slow cookers), more (which is equivalent to high), or less (which is a the same as a keep warm mode). You can also get a glass lid for your Instant Pot to use while slow cooking.
Sauté
The sauté feature is a game changer. Now you can brown your meat directly inside of your cooking vessel, meaning no more skillet to clean! You can vary the temperature of the sauté mode by using the ‘adjust’ button to cycle through the modes of less, normal, and more. Note that the temperature mode must be adjusted within 10 seconds of pressing the sauté button. You will want to get flat-edged wooden spoons to help scrape the bottom of the stainless steel pot. I have a second stainless steel insert so that I can still cook if the other is used for food storage, or is in the dishwasher!
Pressure
This button simply is a toggle between low and high pressure modes.
Manual
This is where you begin pressure cooking. The manual mode can be switched between low and high pressure by using the ‘pressure’ button within 10 seconds of pressing the ‘manual’ button.
Adjust
The adjust button is to adjust the temperature of the slow cooking and sauté modes between less, normal, and more.
Timer
The timer button is for programmed delayed cooking. The timer works for both slow cooking mode and regular pressure cooking mode. The timer button must be pushed within 10 seconds of setting your cooking program’s time, and can be adjusted by the + and – buttons.
Keep warm / Cancel
Pretty self explanatory. First press sets the unit into keep warm mode, and another less turns the unit OFF.
Yogurt
This feature is not offered in the IP-LUX series and is a fully-automated program. I will never use this mode, but some people may be totally stoked to make their own yogurt, if that’s your thing.
Steam
As far as I can tell, the steam button is simply normal high pressure mode with a suggested general time. It can be set all the way down to 0 minutes, meaning once the pot reaches pressure, the cooking program ends and you can perform a quick release. This is especially helpful for cooking leafy vegetables, preventing them from being overcooked.
Porridge and Multigrain
Again, suggested times for a regular high pressure cooking program. It seems the biggest variable in cooking anything in the cereal, rice, quinoa, etc family is the ratio of water used.
Rice
The rice mode is an automated program that starts at 12 minutes. You can cook white / jasmine rice in 20 minutes flat. It operates at low pressure. The ratio of water is of utmost importance and really just requires some experimentation to find the right ratio for your tastes. For rice, I like to use a rice to water ratio of 1.5 to 1. It seems to work pretty well and is super hands-off easy fast.
How to set cooking times:
- Press manual or any cooking program button to begin.
- A cooking time will appear, either suggested or the same as you used in that mode last time.
- Use the + and – keys to adjust time values.
- If you hit the – key down past 0, the time will set to 24 hours and count down from there.
- Remember that the + and – keys adjust time values, where as heat values are adjusted using the ‘adjust’ button, and pressure values use the ‘pressure’ button.

How to use the delayed cooking timer:
- Select either manual (pressure cooking) or slow cook mode, as these are the only two modes compatible with the timer function.
- Set your cooking time.
- Within 10 seconds of setting the cooking time, press the ‘timer’ button.
- Use the +/- keys to set your delay time. I would not advise keeping food out for more than 4 hours, and an average delay of 3 hours is great for a weekday.
- Note: press the ‘keep warm / cancel’ button at any time to cancel the timer.

How to adjust the temperature of slow cooker mode:
- First select ‘slow cook’ mode.
- Set your cooking time.
- Within 10 seconds of setting your cooking time, press the ‘adjust’ key to toggle between ‘less’ (keep warm mode on a CrockPot), ‘regular’ (low on a CrockPot), and ‘more’ (high on a CrockPot.)
How to cook at low pressure:
- Start by pressing the ‘manual’ button.
- Set your cooking time.
- Within 10 seconds of setting your cooking time, use the ‘pressure’ button to toggle between the low and high pressure settings.
How to adjust the temperature of sauté mode:
- Start by pressing the ‘sauté’ button.
- Use the ‘adjust’ button to toggle between ‘less,’ ‘normal,’ and ‘more.’
- Lower the time down from 30 minutes as a safety precaution. One rarely needs to sauté for a half hour unless if they want to burn stuff onto the pot!